Network Device Discovery
Network Device Discovery scans local subnets from the agent host, finds reachable devices, checks common service ports, and helps identify IP and ONVIF cameras without manual address entry.
Run a scan on the right local subnet
Use Network Device Discovery to find devices visible from the agent host. The component reads local IPv4 subnets, scans selected address ranges, stores discovered devices in the runtime discovery list, and checks common ports such as HTTP, HTTPS, and RTSP.
Installed modules can add API-specific discovery. For example, the ONVIF module can test ONVIF device service endpoints and report MEDIA, PTZ, EVENT, IMAGING, and ANALYTICS capabilities.
Open Network Device Discovery
In the Banalytics server interface, open the Network Device Discovery page. The component shows available network adapters and subnets on the machine.
Select a network adapter
Choose the adapter connected to the same subnet as your cameras or devices. On multi-NIC servers, pick the interface facing the target network.
Run the scan
Start a scan for the selected subnet. Results appear as devices are found. A typical class-C camera LAN often completes in 15-60 seconds, depending on timeout and network conditions.
Review discovered devices
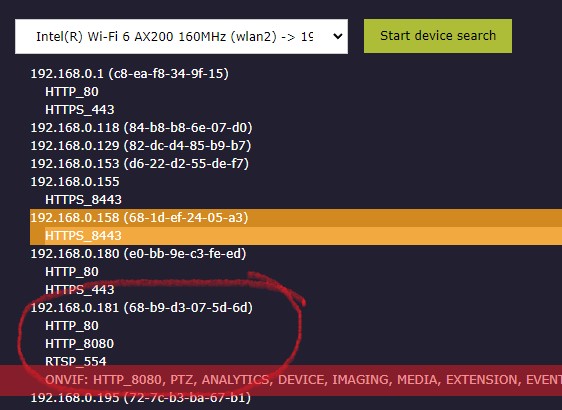
Review IP address, MAC address when available, detected ports, hostname, and ONVIF indicators. Use open ports and ONVIF capabilities to identify cameras.
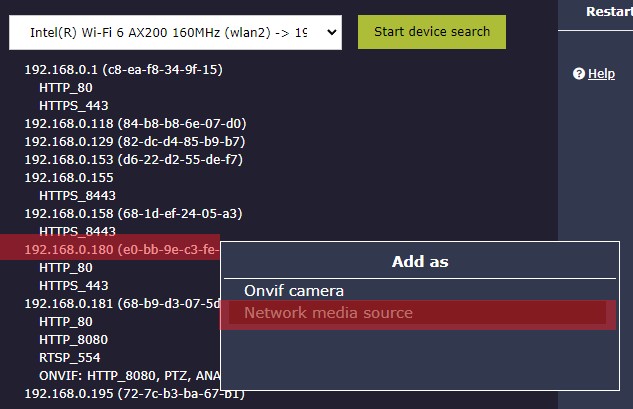
Add a camera
Click an IP address or suitable port from the results to create a camera entry with address and port pre-filled.
Configuration parameters
| Parameter | Required | Description | Default |
|---|---|---|---|
Ping timeout | Yes | Maximum time in milliseconds to wait for ping response from each address. Lower values make scans faster; higher values catch more slow, wireless, VPN, or overloaded devices. Valid range: 500-10000. | 500 |
Scan networks on start | Yes | When enabled, automatically scans available local subnets after startup. Keep disabled on large or sensitive networks where startup should be quiet and predictable. | Disabled |
Discover devices with network and service checks
Discovery uses ping reachability first, then checks service ports for devices in the discovery list. Results are meant to help with configuration and commissioning, not to replace explicit production monitoring.
The scanner operates on local network subnets visible from the agent host. Routers, VLANs, VPN policy, firewalls, and ICMP blocking can hide devices even when a manual device configuration would still work.
IP scanning
Sends reachability checks across the selected address range and records addresses that respond.
Port scanning
Checks common ports such as HTTP, HTTPS, and RTSP to reveal likely services.
MAC lookup
Uses local network resolution where available to associate IP addresses with MAC addresses.
ONVIF discovery
With ONVIF support installed, checks device service endpoints and reports camera capabilities when available.

Use discovery for commissioning and diagnostics
Recommended profiles
Small local camera LAN
Keep Ping timeout around 500-1000 ms, enable Scan networks on start if automatic discovery is convenient, and review detected HTTP, RTSP, and ONVIF ports after startup.
Wi-Fi or slow devices
Increase Ping timeout to 1500-3000 ms so battery-powered, wireless, or slow-responding devices are less likely to be missed.
VPN or routed subnet
Scan manually with a higher timeout. Some VPNs and routers block ICMP or ARP, so discovery may miss devices even when manual configuration works.
Large corporate network
Keep Scan networks on start disabled, scan only the intended subnet, and coordinate with the network policy owner because ping and port checks can look like active network scanning.
ONVIF camera commissioning
Enable the ONVIF module, scan the camera subnet, then use detected capabilities and open ports to decide whether to create ONVIF camera entries and which services are available.
Identifying cameras in the list
A scan returns every visible device on the subnet, not just cameras. Use service signals to identify cameras among printers, NAS boxes, phones, and other devices.
RTSP port
Port 554 is the standard RTSP video streaming port. A device with this port open is likely a camera or video encoder.
HTTP ports
Ports 80 and 8080 often expose camera management interfaces. Combined with RTSP or ONVIF, they are strong camera indicators.
ONVIF badge
An ONVIF indication means the device responded to a capabilities request. Check reported media, PTZ, event, imaging, or analytics capabilities.
MAC prefix
The first bytes of a MAC address identify the manufacturer. Use them to confirm the device is from a known camera vendor.
Adding cameras from results
Click a port number
Banalytics can add the device using the selected port. If the port carries an ONVIF indication, use the ONVIF camera path.
Click an IP address
Use the IP address when you want to choose the camera type yourself or when several ports are open and you want to confirm the correct one.
Operational notes
ICMP-blocking devices can be missed
Discovery uses ping reachability first. Devices that block ICMP can be missed by a fresh scan even if their TCP ports are reachable.
Scans can be cancelled
Scans run with a fixed worker pool and can be cancelled, but addresses already being checked may finish their current timeout.
Use explicit production configuration
Discovery results are for commissioning and diagnostics. For stable production monitoring, configure camera or integration components explicitly with final host, port, credentials, and service settings.
Review unexpected open ports
Port information can reveal reachable services on the local network. Review unexpected ports as part of routine security practice.
After finding your cameras
Once a camera has been identified from discovery results, configure the correct camera component and attach the tasks your setup requires.